Hexo (NexT) Installation and Configuration (The Most Complete)
Installation Process(MacOS)
Create a new repository on Github named
{yourname}.github.io. The{yourname}must be the same as your Github username.Install hexo (node and git need to be installed previously)
npm install -g hexo-cliCreate local blog folder
hexo init myBlogcd myBlognpm installInstall hexo developer git
npm install hexo-deployer-git --saveCreate new blog
hexo new "My New Post"Start local server
hexo sSo far you can open the browser and go to localhost:4000, then you will see the Hello World page
Add github push configuration to hexo
_config.yml(there is space between key and value, BE CAREFUL)1
2
3
4deploy:
type: git
repo: https://github.com/{yourname}/{yourname}.github.io.git
branch: masterClean the
publicfolder to avoid cachehexo cleanPush to github (
gstands for generate the needed files inpublicfolder)hexo g -dGo to
{yourname}.github.ioand you will see the succeful online page
Configuration
Image Uploader
Prepare an online image uploader like Picgo, and follow the instructions
Jupyter Code Block Support
Embed Local File
npm install hexo-jupyter-notebook –save`
brew install pandocpip install nbconvertUpdate
_config.ymlin hexo folder –>post_asset_folder: trueCreate new folder named jupyter under folder _post to save the ipynb code blocks
mkdir jupyter-demoAdd the following code to your target md file
If you want to change the height and width of the iframe, please go to
node_moduleof hexo, and findmain.pyinhexo-jupyter-notebook, change the relative configuration.1
2
3<iframe id='ipynb' marginheight="0" frameborder="0" width='924px'
height='680px' srcdoc="%s" style="scrolling:yes;">
</iframe>
Embed Online File
Go to https://nbviewer.jupyter.org/ and paste the link of online jupyter notebook, like
https://github.com/kinglin/YTClip/blob/cliptrial/02_Code/01_Scripts/FrameSampling.ipynb
Use the following code block and input the generated URL by nbviewer:
1 | <iframe src="your_URL" width="700" height="500"></iframe> |
Go to the root folder of your blog
git clone https://github.com/theme-next/hexo-theme-next themes/nextUpdate
_config.ymlin hexo folder –>theme: next
Add Space between Chinese character and English words Automately
npm install hexo-filter-auto-spacing --save
Then you can find the denpendency in package.json :"hexo-filter-auto-spacing": "^0.2.1"
Add Search Feature
npm install hexo-generator-searchdb --save
Update _config.yml in hexo folder
1 | search: |
Update _config.yml in NexT folder
1 | local_search: |
Attach Custom Domain
Buy one at aliyun.com or godaddy.com or any websites that provide the services.
Take aliyun.com as example, we need to resolve the domain and add 2 records.

Go to your github page settings and attach the customized domain.
Go to hexo
sourcefolder and add a new file namedCNAME, fill in the domain. (To avoid being wiped out when submit changes to github)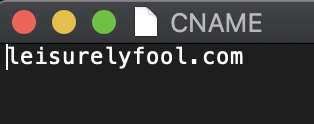
Add Feedback (Valine)
Update
_config.ymlin theme next –> enable valineLogin or register on LeanCloud, then replace the appid and appkey to
_config.yml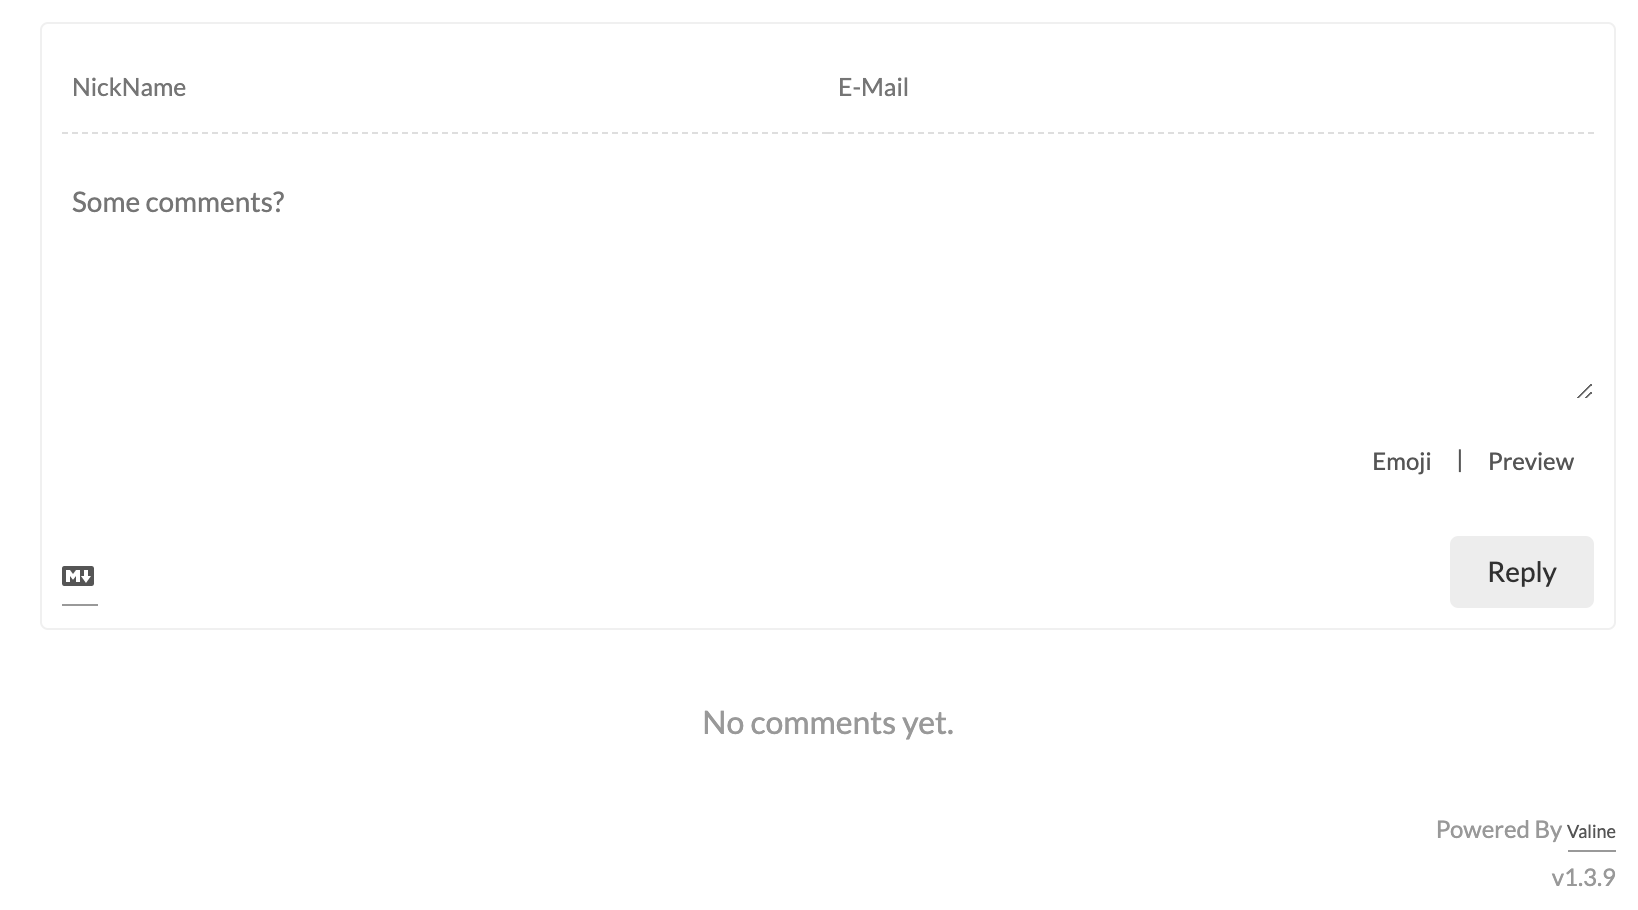
Add Word Count & Estimate Reading Time
npm install hexo-symbols-count-time --saveAdd following code block to hexo
_config.yml1
2
3
4symbols: true
time: true
total_symbols: true
total_time: trueEnable field
symbols_count_timein NexT_config.yml
Change URI to Permanent Link
As we know, the original link of our posts is composited by year, month, day and title, but this location is not friendly enough to SEO, so that we need to change it to the permanent way.
npm install hexo-abbrlink --saveUpdate hexo
_config.yml1
2
3
4permalink: posts/:abbrlink.html
abbrlink:
alg: crc32 # 算法:crc16(default) and crc32
rep: hex # 进制:dec(default) and hexRestart hexo and we will find the link of our post will be like
localhost:4000/posts/12345.html
Add Google Analytics
Register on Google Analytics
Apply a new account for your website and you will get an
tracking_idlikeUA-14xxxx949-1Update NexT
_config.yml1
2
3google_analytics:
tracking_id: UA-14xxxx949-1
localhost_ignored: true
Add SEO Related
Add Sitemap
npm install hexo-generator-sitemap --saveAdd following config in hexo
_config.yml:1
2sitemap:
path: sitemap.xmlchange URL to your own domain
Add robot.txt
Create a new file named
robot.txtunder the folder hexosource, and fill in the following text.1
2
3
4
5
6
7
8
9
10
11
12
13User-agent: *
Allow: /
Allow: /archives/
Disallow: /vendors/
Disallow: /js/
Disallow: /css/
Disallow: /fonts/
Disallow: /vendors/
Disallow: /fancybox/
Sitemap: https://pojian.xyz/sitemap.xml
Sitemap: https://pojian.xyz/baidusitemap.xmlhexo cleanhexo g -dAdd sitemap to Google Search Console
Block Testing
Code Block
1 | print("helloworld") |
This is the explaination of the code block.
Test Image Upload
Test Jupyter Code Block
Test Video Embedded
## Test FormulaThis doesn’t work $$\frac{1}{1+\frac{1}{2}}$$ (TODO)
Transform formula to image on https://www.codecogs.com/latex/eqneditor.php?lang=zh-cn

Reference
https://segmentfault.com/a/1190000017986794
http://huanyouchen.github.io/2018/05/30/hexo-support-jupyter-notebook-in-blog/
https://github.com/Molunerfinn/PicGo
https://www.jianshu.com/p/191d1e21f7ed
https://fontawesome.com/v4.7.0/icons/
https://valine.js.org/hexo.html#hexo-theme-raytaylorism
https://blog.csdn.net/weixin_43971764/article/details/96754325
https://juejin.im/post/5c38b63f6fb9a04a0a5f68b3
http://chitanda.me/2015/11/03/multiple-git-pages-in-one-github-account/
- Post link: https://leisurelyfool.com/posts/19796.html
- Copyright Notice: All articles in this blog are licensed under BY-NC-SA unless stating additionally.